【Android Studio】メモアプリの作成 Firebaseを用いてログイン機能を実装
メール・パスワードによるアカウント認証機能を持つメモアプリを作ります。また、作成しメモはクラウドに保存されるため、他の端末からログインすれば同じメモを見ることができますし、編集もできます。メモアプリにわざわざ認証機能を追加する必要があるのかと考えればそれまでですが、勉強の一環として実践しようと思います。
デモンストレーション
こんな感じのやつを作ります。
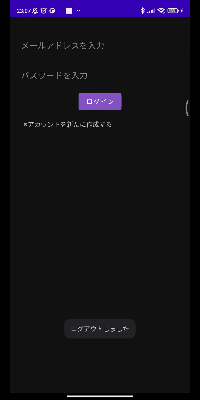
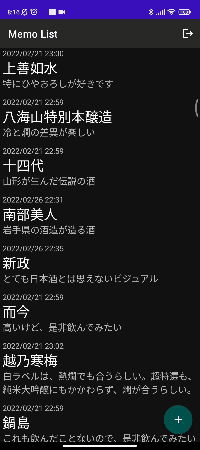
こんな感じのメモアプリを作成します。ログイン、ログアウトの他にも、アカウント作成やメモの作成といった、基本的な機能はすべて備えたメモアプリの作成です。
Firebaseについて
Firebaseを利用する際は、プロジェクトのセットアップを行い、ここで様々な手順を踏んでようやく利用できるようになります。ただ、この作業自体は、セットアップ時に親切な指示を色々としてくれるので、意外と簡単です。
とりあえず、「firebase」と検索をかけて、トップに出てきたGoogleのサイトにアクセスすると、以下の画像のような画面になると思います。この画面で、「使ってみる」をクリックすると、プロジェクトのセットアップや、プロジェクトの管理を行うFirebaseコンソールに遷移します。

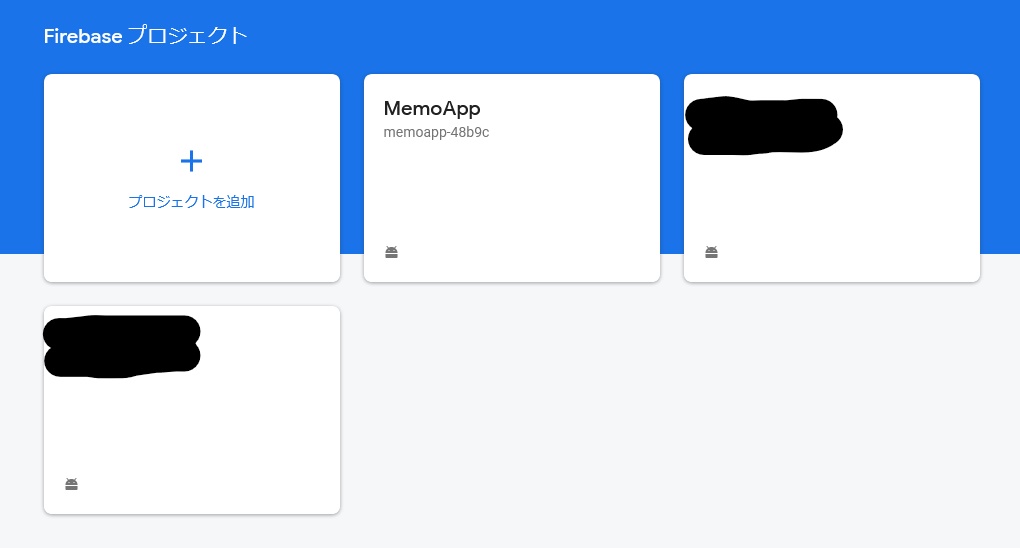
これがFirebaseコンソールです。ここのプロジェクト作成をクリック。
あとは、指示に従ってプロジェクトの作成を完了してください。
Firebase Authentication
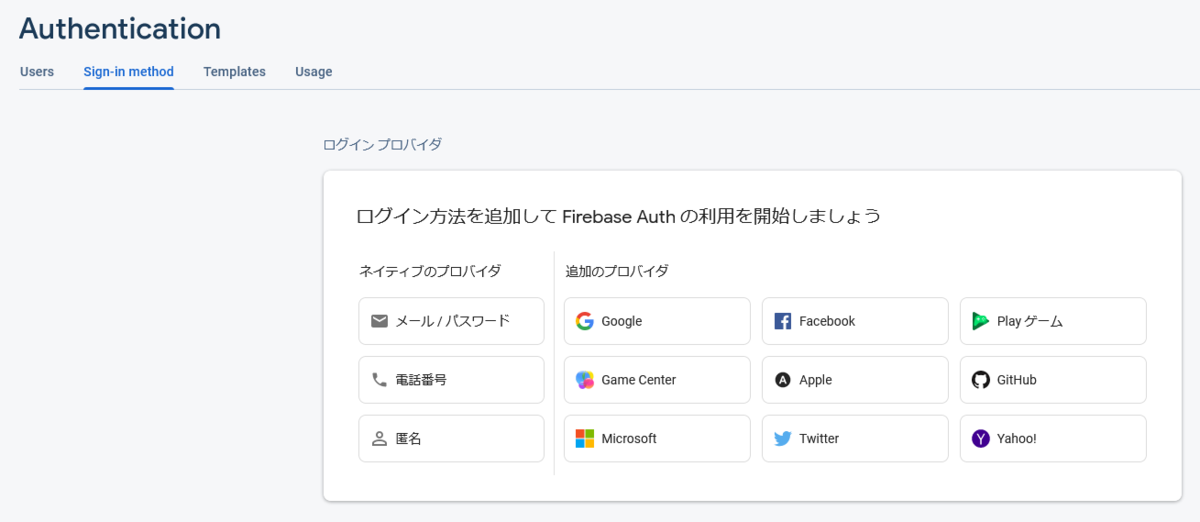
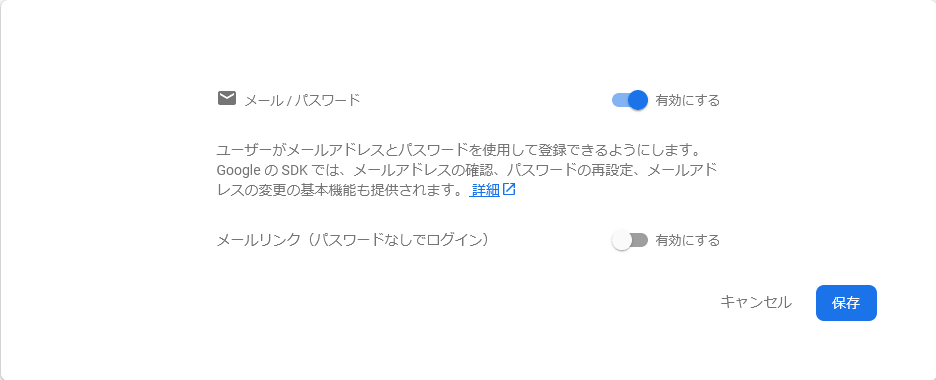
今回は、メールアドレスとパスワードによる認証方法を使用するので、sign-in-methodタブから、メール/パスワードをクリックします。
クリックして、メール/パスワードを有効にして保存してください。
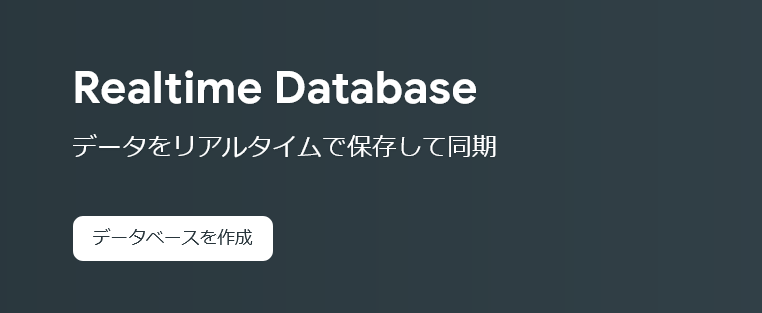
Firebase Authenticationの設定はこれで完了です。続いて、Realtime Databaseの設定をしていきます。
Firebase Realtime Database
Realtime Databaseの画面に入ると、最初には以下の画面が表示されているのでデータベースを作成をクリックします。
すると、データベースのロケーションを設定します。ここでは米国(us-central1)を選択します。
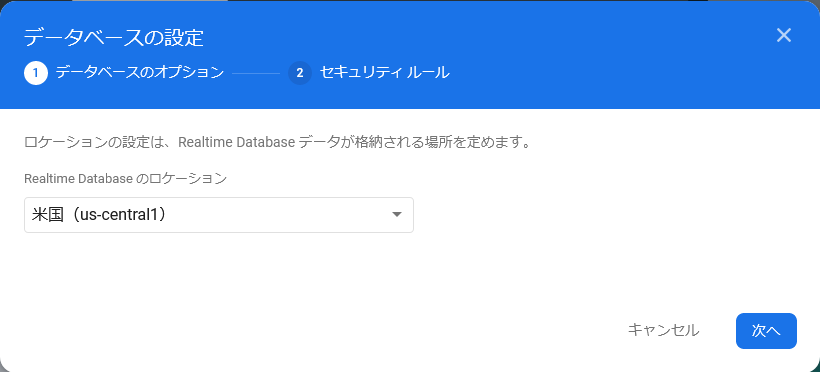
次に、セキュリティルールの設定を行います。とりあえずロックモードでいいです。

完了したら、右下の「有効にする」をクリックしてデータベースの構築を完了してください。詳しいことは、この記事では述べませんので、これ以上に詳しい手法について知りたい場合は、ご自身で調べてみてください。この記事よりよっぽど分かりやすい記事がたくさんアップされています。
とりあえず、アプリ開発の方に進んでいきます。
アプリの仕様
最初に今回開発するアプリの大まかな仕様について決めていきたいと思います。
画面遷移はActivityResultLauncherを主軸とする
シンプルな画面遷移を行う場合、多くはstartActivityメソッドを使うケースが多いですが、個人的にはActivityResultLauncherの方が好きです。アクティビティ間(フラグメント間)で何かしらの値を渡したい場合、例えば、アクティビティAでユーザが入力した文字列を、アクティビティBへ渡したい場合に活用することができます。さらに、最近になってstartActivityForResult()メソッドが非推奨となった影響もあり、このアプリではActivityResultLauncherをメインで使うことにします。
アクティビティの役割
作成するアクティビティの役割をまとめます。それが以下の通りです。
Javaファイル名 |
XMLファイル名 |
役割 |
|---|---|---|
MemoListActivity |
activity_memo_list |
メモのリスト表示 |
CreateMemoActivity |
activity_create_memo |
メモの作成 |
LoginActivity |
activity_login |
既存アカウントにログイン |
CreateAccountActivity |
activity_create_account |
新たなアカウントの作成 |
MemoData |
無し |
メモ一つが持つデータ型 |
CustomListAdapter |
無し |
独自のリストアダプタ |
アクティビティとは言っていますが、MemoDataとCustomListAdapterはアクティビティではなく、ただのJavaファイルです。
アクションバーの非表示
今回は、アクションバーを非表示にしたいと思います。なので、themes.xmlファイルを開いて以下のように記述してください。
<resources xmlns:tools=...>
    <!-- Base application theme. -->

    //以下の文
    <style name="Theme.MemoApp" parent="Theme.MaterialComponents.DayNight.NoActionBar">

        //省略

    </style>
</resources>
文の最後に「NoActionBar」と追記しているだけです。これで、アプリ画面上部に表示されるアクションバーが表示されなくなります。
レイアウトの作成
まずはレイアウトを作成します。右下のFloatingActionボタンを配置して、それをクリックすることで新たなメモを作成できるようにします。また、Stringデータは面倒だし分かりにくくなると思うので使いません。
activity_memo_list
メモのリスト表示を行うアクティビティのレイアウトファイル(activity_memo_list.xml)です。
<?xml version="1.0" encoding="utf-8"?>
<androidx.constraintlayout.widget.ConstraintLayout xmlns:android="http://schemas.android.com/apk/res/android"
    xmlns:app="http://schemas.android.com/apk/res-auto"
    xmlns:tools="http://schemas.android.com/tools"
    android:layout_width="match_parent"
    android:layout_height="match_parent"
    tools:context=".MemoListActivity">

    <com.google.android.material.appbar.AppBarLayout
        android:id="@+id/app_bar"
        android:layout_width="match_parent"
        android:layout_height="wrap_content"
        app:layout_constraintStart_toStartOf="parent"
        app:layout_constraintTop_toTopOf="parent">

        <androidx.appcompat.widget.Toolbar
            android:id="@+id/tool_bar"
            android:layout_width="match_parent"
            android:layout_height="?android:actionBarSize" />

    </com.google.android.material.appbar.AppBarLayout>

    <ListView
        android:id="@+id/memo_list"
        android:layout_width="match_parent"
        android:layout_height="0dp"
        app:layout_constraintBottom_toBottomOf="parent"
        app:layout_constraintStart_toStartOf="parent"
        app:layout_constraintTop_toBottomOf="@id/app_bar" />

    <com.google.android.material.floatingactionbutton.FloatingActionButton
        android:id="@+id/add_new_memo"
        android:layout_width="wrap_content"
        android:layout_height="wrap_content"
        android:layout_marginRight="15dp"
        android:layout_marginBottom="15dp"
        android:src="@drawable/add_24"
        app:layout_constraintBottom_toBottomOf="parent"
        app:layout_constraintEnd_toEndOf="parent" />

</androidx.constraintlayout.widget.ConstraintLayout>
特に難しい部分はありません。非表示にしたツールバーを、9行目から19行目の部分で記述しています。言い換えれば、xmlファイルでこの記述をしない場合はツールバーが表示されなくなります。
activity_create_memo
メモをリストに追加するアクティビティのレイアウトファイルです。
<?xml version="1.0" encoding="utf-8"?>
<androidx.constraintlayout.widget.ConstraintLayout xmlns:android="http://schemas.android.com/apk/res/android"
    xmlns:app="http://schemas.android.com/apk/res-auto"
    xmlns:tools="http://schemas.android.com/tools"
    android:layout_width="match_parent"
    android:layout_height="match_parent"
    tools:context=".CreateMemoActivity">

    <EditText
        android:id="@+id/memo_title"
        android:layout_width="0dp"
        android:layout_height="60dp"
        android:layout_marginLeft="20dp"
        android:layout_marginTop="40dp"
        android:layout_marginRight="20dp"
        android:hint="メモのタイトルを入力"
        app:layout_constraintEnd_toEndOf="parent"
        app:layout_constraintStart_toStartOf="parent"
        app:layout_constraintTop_toTopOf="parent" />

    <EditText
        android:id="@+id/memo_contents"
        android:layout_width="0dp"
        android:layout_height="wrap_content"
        android:layout_marginTop="40dp"
        android:layout_marginLeft="10dp"
        android:layout_marginRight="10dp"
        android:hint="コンテンツを入力"
        app:layout_constraintEnd_toEndOf="parent"
        app:layout_constraintStart_toStartOf="parent"
        app:layout_constraintTop_toBottomOf="@+id/memo_title" />

    <Button
        android:id="@+id/add_new_memo"
        android:layout_width="wrap_content"
        android:layout_height="wrap_content"
        android:layout_marginTop="20dp"
        android:layout_marginRight="30dp"
        android:backgroundTint="#adadad"
        android:text="追加"
        android:textSize="18sp"
        app:layout_constraintEnd_toEndOf="parent"
        app:layout_constraintTop_toBottomOf="@+id/memo_contents" />

</androidx.constraintlayout.widget.ConstraintLayout>
custom_memo_card.xml
メモリストに表示されるリストのカード一枚分のレイアウトです。これを応用すれば、自分の思うようなウィジェットを、リスト状に表示することができます。
<?xml version="1.0" encoding="utf-8"?>
<androidx.constraintlayout.widget.ConstraintLayout xmlns:android="http://schemas.android.com/apk/res/android"
    xmlns:app="http://schemas.android.com/apk/res-auto"
    android:layout_width="match_parent"
    android:layout_height="wrap_content">

    <LinearLayout
        android:layout_width="match_parent"
        android:layout_height="wrap_content"
        android:orientation="vertical"
        android:paddingBottom="6dp"
        app:layout_constraintStart_toStartOf="parent"
        app:layout_constraintTop_toTopOf="parent">

        <TextView
            android:id="@+id/memo_date"
            android:layout_width="wrap_content"
            android:layout_height="wrap_content"
            android:text="Date"
            android:textSize="15sp"
            android:layout_marginLeft="5dp" />

        <TextView
            android:id="@+id/memo_title"
            android:layout_width="wrap_content"
            android:layout_height="wrap_content"
            android:layout_marginLeft="5dp"
            android:text="Sample Title"
            android:textSize="27sp"
            android:maxLines="1"
            android:ellipsize="end"
            android:textAppearance="?android:attr/textAppearance"
            app:layout_constraintStart_toStartOf="parent"
            app:layout_constraintTop_toTopOf="parent" />

        <TextView
            android:id="@+id/memo_contents"
            android:layout_width="wrap_content"
            android:layout_height="wrap_content"
            android:text="sample contents "
            android:textSize="18sp"
            android:maxLines="2"
            android:ellipsize="end"
            android:layout_marginLeft="5dp"
            android:layout_marginBottom="6dp"/>

    </LinearLayout>

</androidx.constraintlayout.widget.ConstraintLayout>
今回の開発で初めて知った、少し便利な関数を紹介します
30行目(android:maxLines)
TextViewに表示できる最大行数を設定することができます。指定した行数を超える文字を表示しようとしても、指定した行数を超えることがなくなります。
31行目(android:ellipsize)
今回は"end"の属性を与えています。この場合は、行数を超える文章を表示させようとすると、最後に「...」が追加されます。ユーザ目線では、「この後も文章が続いているんだな」と思わせることができます。
activity_login.xml
ログインを行うためのアクティビティのレイアウトです。
<?xml version="1.0" encoding="utf-8"?>
<androidx.constraintlayout.widget.ConstraintLayout xmlns:android="http://schemas.android.com/apk/res/android"
    xmlns:app="http://schemas.android.com/apk/res-auto"
    xmlns:tools="http://schemas.android.com/tools"
    android:layout_width="match_parent"
    android:layout_height="match_parent"
    tools:context=".LoginActivity">

    <EditText
        android:id="@+id/email"
        android:layout_width="match_parent"
        android:layout_height="wrap_content"
        android:inputType="textEmailAddress"
        android:layout_marginTop="40dp"
        android:layout_marginLeft="20dp"
        android:layout_marginRight="20dp"
        android:hint="メールアドレスを入力"
        app:layout_constraintEnd_toEndOf="parent"
        app:layout_constraintStart_toStartOf="parent"
        app:layout_constraintTop_toTopOf="parent" />

    <EditText
        android:id="@+id/password"
        android:layout_width="match_parent"
        android:layout_height="wrap_content"
        android:inputType="textPassword"
        android:layout_marginTop="20dp"
        android:layout_marginLeft="20dp"
        android:layout_marginRight="20dp"
        android:hint="パスワードを入力"
        app:layout_constraintEnd_toEndOf="parent"
        app:layout_constraintStart_toStartOf="parent"
        app:layout_constraintTop_toBottomOf="@+id/email" />

    <Button
        android:id="@+id/loginButton"
        android:layout_width="wrap_content"
        android:layout_height="wrap_content"
        android:layout_marginTop="10dp"
        android:text="ログイン"
        app:layout_constraintEnd_toEndOf="parent"
        app:layout_constraintStart_toStartOf="parent"
        app:layout_constraintTop_toBottomOf="@+id/password" />

    <TextView
        android:id="@+id/createAccount"
        android:layout_width="wrap_content"
        android:layout_height="wrap_content"
        android:text="※アカウントを新たに作成する"
        android:layout_marginTop="16dp"
        android:textSize="14sp"
        app:layout_constraintEnd_toEndOf="parent"
        app:layout_constraintHorizontal_bias="0.15"
        app:layout_constraintStart_toStartOf="parent"
        app:layout_constraintTop_toBottomOf="@+id/loginButton" />

</androidx.constraintlayout.widget.ConstraintLayout>
activity_create_account.xml
アカウント作成を行うためのアクティビティのレイアウトです。
<?xml version="1.0" encoding="utf-8"?>
<androidx.constraintlayout.widget.ConstraintLayout xmlns:android="http://schemas.android.com/apk/res/android"
    xmlns:app="http://schemas.android.com/apk/res-auto"
    xmlns:tools="http://schemas.android.com/tools"
    android:layout_width="match_parent"
    android:layout_height="match_parent"
    tools:context=".CreateAccountActivity">


    <EditText
        android:id="@+id/email"
        android:layout_width="match_parent"
        android:layout_height="wrap_content"
        android:inputType="textEmailAddress"
        android:layout_marginTop="40dp"
        android:layout_marginLeft="20dp"
        android:layout_marginRight="20dp"
        android:hint="メールアドレスを入力"
        app:layout_constraintEnd_toEndOf="parent"
        app:layout_constraintStart_toStartOf="parent"
        app:layout_constraintTop_toTopOf="parent" />

    <EditText
        android:id="@+id/password"
        android:layout_width="match_parent"
        android:layout_height="wrap_content"
        android:inputType="textPassword"
        android:layout_marginTop="20dp"
        android:layout_marginLeft="20dp"
        android:layout_marginRight="20dp"
        android:hint="パスワードを入力"
        app:layout_constraintEnd_toEndOf="parent"
        app:layout_constraintStart_toStartOf="parent"
        app:layout_constraintTop_toBottomOf="@+id/email" />

    <EditText
        android:id="@+id/rePassword"
        android:layout_width="match_parent"
        android:layout_height="wrap_content"
        android:inputType="textPassword"
        android:layout_marginTop="20dp"
        android:layout_marginLeft="20dp"
        android:layout_marginRight="20dp"
        android:hint="もう一度パスワードを入力"
        app:layout_constraintEnd_toEndOf="parent"
        app:layout_constraintStart_toStartOf="parent"
        app:layout_constraintTop_toBottomOf="@+id/password" />

    <Button
        android:id="@+id/createAccount"
        android:layout_width="wrap_content"
        android:layout_height="wrap_content"
        android:layout_marginTop="10dp"
        android:text="アカウントを作成する"
        app:layout_constraintEnd_toEndOf="parent"
        app:layout_constraintStart_toStartOf="parent"
        app:layout_constraintTop_toBottomOf="@+id/rePassword" />


</androidx.constraintlayout.widget.ConstraintLayout>
inputType属性を与えることで、テキストボックスに様々な特徴を持たせることができます。例えば、"textPassword"を与えると、入力した文字が中黒で表示されるようになります。
Javaソースコード
続いて、Javaのソースコードを紹介します。上記に示したアクティビティの順番通りに紹介します。また、Javaのコードは、できるだけコードが短くなるように基本的にはラムダ式で記述しています。
MemoListActivity.java
//パッケージの宣言部分なので省略
package...

//ただのインポート文の羅列なので省略
import...

public class MemoListActivity extends AppCompatActivity {

    private DatabaseReference reference;
    private FirebaseUser user;
    private String uid;

    //CustomListAdapterについては後述します
    private CustomListAdapter customListAdapter;

    @Override
    protected void onCreate(Bundle savedInstanceState) {
        super.onCreate(savedInstanceState);
        setContentView(R.layout.activity_memo_list);

        setSupportActionBar(findViewById(R.id.tool_bar));
    }

    @Override
    protected void onResume() {
        super.onResume();

        //ログイン状態の確認
        user = FirebaseAuth.getInstance().getCurrentUser();
        if (user == null){

            //ログインしていない場合、ログイン画面へ遷移
            Intent intent = new Intent(MemoListActivity.this, LoginActivity.class);
            resultLauncher.launch(intent);
        } else {
            appSetup();
        }
    }

    private void appSetup(){
        Toolbar toolbar = findViewById(R.id.tool_bar);
        ListView memoListView = findViewById(R.id.memo_list);
        ArrayList<MemoData> memoListItem = new ArrayList<>();

        toolbar.setTitle("Memo List");

        user = FirebaseAuth.getInstance().getCurrentUser();
        assert user != null;
        uid = user.getUid();

        FirebaseDatabase database = FirebaseDatabase.getInstance();
        reference = database.getReference("users").child(uid);

        customListAdapter = new CustomListAdapter(this, R.layout.custom_memo_card, memoListItem);
        memoListView.setAdapter(customListAdapter);

        databaseListener();


        FloatingActionButton addMemo = findViewById(R.id.add_new_memo);

        addMemo.setOnClickListener(v -> {
            Intent intent = new Intent(MemoListActivity.this, CreateMemoActivity.class);
            resultLauncher.launch(intent);
        });

        memoListView.setOnItemLongClickListener((parent, view, position, id) -> {
            MemoData memoData =(MemoData) memoListView.getItemAtPosition(position);
            AlertDialog.Builder builder = new AlertDialog.Builder(this);
            builder.setTitle("メモの削除")
                    .setMessage("選択したメモを削除しますか?")
                    .setPositiveButton("削除",(dialog, which) -> {
                            reference.child("Memo").child(memoData.get_memoTitle()).removeValue((error, ref) -> {
                        databaseListener();
                        Toast.makeText(MemoListActivity.this, "メモを削除しました", Toast.LENGTH_SHORT).show();
                            });
                    })
                    .setNegativeButton("やめる",(dialog, which) -> {})
                    .show();
            return false;
        });
    }

    private void logout(){
        AuthUI.getInstance()
                .signOut(this)
                .addOnCompleteListener(task -> {
                    Intent intent = new Intent(MemoListActivity.this, LoginActivity.class);
                    Toast.makeText(this, "ログアウトしました", Toast.LENGTH_SHORT).show();
                    resultLauncher.launch(intent);
                });
    }

    //画面遷移を行うためのインターフェース
    ActivityResultLauncher<Intent> resultLauncher = registerForActivityResult(new ActivityResultContracts.StartActivityForResult(),
            result -> {
        if (result.getResultCode() == LoginActivity.RESULT_CODE_LOGIN){
            Toast.makeText(this, "ログインしました", Toast.LENGTH_SHORT).show();
        }
        if (result.getResultCode() == CreateMemoActivity.RESULT_CODE_CREATE_MEMO){
            Intent intent = result.getData();
            assert intent != null;
            String[] memo = intent.getStringArrayExtra("memo");
            MemoData memoData = new MemoData(uid, memo[0], memo[1], memo[2]);

            //Realtime Databaseにデータを保存する
            reference.child("Memo").child(memo[1]).setValue(memoData).addOnCompleteListener(task -> {
                if (task.isSuccessful()){
                    databaseListener();
                    Toast.makeText(MemoListActivity.this,"メモを追加しました",Toast.LENGTH_SHORT).show();
                }else {
                    Toast.makeText(MemoListActivity.this,"メモの追加に失敗しました",Toast.LENGTH_SHORT).show();
                }
            });
        }
    });

    //ツールバーにオプションメニューを追加する
    @Override
    public boolean onCreateOptionsMenu(Menu menu) {
        super.onCreateOptionsMenu(menu);
        MenuInflater inflater = getMenuInflater();
        inflater.inflate(R.menu.memo_list_tool_bar, menu);
        return true;
    }

    //ツールバーのオプションをクリックしたときの処理
    @Override
    public boolean onOptionsItemSelected(@NonNull MenuItem item) {
            if (item.getItemId() == R.id.logout){
                AlertDialog.Builder builder = new AlertDialog.Builder(this);
                builder.setTitle("ログアウト確認")
                        .setMessage("ログアウトしますか?")
                        .setPositiveButton("はい", (dialog, which) -> {
                            logout();
                        })
                        .setNegativeButton("やめる", (dialog, which) -> {

                        })
                        .show();
            }
        return super.onOptionsItemSelected(item);
    }

    //データベースの更新を検出する
    private void databaseListener(){
        customListAdapter.clear();
        user = FirebaseAuth.getInstance().getCurrentUser();
        assert user != null;
        uid = user.getUid();

        FirebaseDatabase database = FirebaseDatabase.getInstance();
        reference = database.getReference("users").child(uid);
        reference.child("Memo").addChildEventListener(new ChildEventListener() {
            //データベースに追加された要素があれば実行される
            @Override
            public void onChildAdded(@NonNull DataSnapshot snapshot, @Nullable String previousChildName) {
                MemoData memoData = snapshot.getValue(MemoData.class);
                customListAdapter.add(memoData);
                customListAdapter.notifyDataSetChanged();
            }

            @Override
            public void onChildChanged(@NonNull DataSnapshot snapshot, @Nullable String previousChildName) {

            }

            //データベースに削除された要素があれば実行される
            @Override
            public void onChildRemoved(@NonNull DataSnapshot snapshot) {
                MemoData memoData = snapshot.getValue(MemoData.class);
                customListAdapter.add(memoData);
                customListAdapter.notifyDataSetChanged();
            }

            @Override
            public void onChildMoved(@NonNull DataSnapshot snapshot, @Nullable String previousChildName) {

            }

            @Override
            public void onCancelled(@NonNull DatabaseError error) {

            }
        });
    }
}
メインアクティビティ的な立ち位置なので、かなり長くなってしまいました。部分的にコメントを書きましたが、一応少しだけ説明を加えます。
54行目(customListAdapter)
後述するクラスをインスタンス化しています。このクラスは、リスト表示をになるアダプタを継承したクラスです。そのクラスを用いることでアダプタをカスタマイズしています。
107行目(setValue(object))
Realtime databaseに値をセットします。Realtime databaseを通じて、アカウントごとにメモを保存します。すなわち、ログアウトをしたとしてもメモの内容が消えることはなく、ログインすることで再びメモを表示することができます。また、アカウントごとに保存なので、機種変更やアプリの再インストールなどでデータが消えることもなく、アカウントにログインさえすれば同じ内容のメモを表示することができます。ちなみに、Firebaseコンソールでは以下の画像のように表示されています。

121行目(inflater.inflate)
ツールバーのオプションメニューに表示する内容をメニューファイルを渡しています。このメニューファイルは次の通りです。
<?xml version="1.0" encoding="utf-8"?>
<menu xmlns:android="http://schemas.android.com/apk/res/android"
    xmlns:app="http://schemas.android.com/apk/res-auto">
    <item android:id="@+id/logout"
        android:icon="@drawable/logout_24"
        android:title="Logout"
        app:showAsAction="ifRoom"/>
</menu>
メニューファイルの作成は、「Project」ファイル内の「res」⇒「menu」を右クリックして、「New」⇒「Menu Resource File」から作成できます。
このファイルの5行目のdrawableは、vectorファイルです。vectorファイルの作成は、Android Studioの画面の左上の「File」から「New」⇒「Vector Asset」から作成できます。また、showAsAction属性には"ifRoom"としています。これは、ツールバーにアイコンを表示する余裕がある場合は、そのアイコンを表示し、できない場合はオーバーフローメニューの中に格納するように表示するための属性です。
CreateMemoActivity.java
新たなメモを作成するアクティビティです。MemoListActivityの右下に表示されたボタンから遷移します。
package...

import...

public class CreateMemoActivity extends AppCompatActivity {

    public static final int RESULT_CODE_CREATE_MEMO = 3000;

    @Override
    protected void onCreate(Bundle savedInstanceState) {
        super.onCreate(savedInstanceState);
        setContentView(R.layout.activity_create_memo);

        EditText memoTitle = findViewById(R.id.memo_title);
        EditText memoContents = findViewById(R.id.memo_contents);
        Button addButton = findViewById(R.id.add_new_memo);

        addButton.setOnClickListener(v -> {
            //メモタイトルに何も入力されていない場合は、必須項目であることをユーザに知らせる。
            if (!memoTitle.getText().toString().isEmpty()){

                //コンテンツに何も入力されていない場合は「詳細なし」で登録する。
                if (memoContents.getText().toString().isEmpty()) {
                    memoContents.setText("詳細なし");
                }
                String[] memo = {getCurrentDate(), memoTitle.getText().toString(), memoContents.getText().toString()};
                Intent intent = getIntent();

                intent.putExtra("memo", memo);
                setResult(RESULT_CODE_CREATE_MEMO, intent);
                finish();

            } else {
                memoTitle.setError("必須入力の項目です");
            }
        });
    }

    //現在日時を取得するメソッド
    private String getCurrentDate(){
        @SuppressLint
                ("SimpleDateFormat") SimpleDateFormat dateFormat = new SimpleDateFormat("yyyy/MM/dd HH:mm");
        Date d = new Date();
        return dateFormat.format(d);
    }
}
こんな感じです。メモの追加は、Addボタンをクリックしたときに追加され、クリック時にタイトルが未記入の場合はメモを追加できないようになっています。ただし、メモの内容が未記入の場合は「詳細なし」として格納されます。またメモの追加時に、その時点での日付を取得し、メモの作成日時としています。
LoginActivity.java
既存のアカウントにログインするためのアクティビティです。また、アカウント作成をするための画面にも遷移することができます。
package...

import...

public class LoginActivity extends AppCompatActivity {

    public static final int RESULT_CODE_LOGIN = 1000;
    private FirebaseAuth mAuth;

    @Override
    protected void onCreate(Bundle savedInstanceState) {
        super.onCreate(savedInstanceState);
        setContentView(R.layout.activity_login);

        activitySetup();
    }

    private void activitySetup(){
        EditText email = findViewById(R.id.email);
        EditText passWord = findViewById(R.id.password);
        Button login = findViewById(R.id.loginButton);
        TextView createAccount = findViewById(R.id.createAccount);

        login.setOnClickListener(v -> {

            //入力欄が空欄でないか確認
            if (!email.toString().isEmpty()) {

                //入力欄が空欄でないか確認
                if (!passWord.toString().isEmpty()) {
                    //ログイン処理の開始
                    mAuth = FirebaseAuth.getInstance();
                    mAuth.signInWithEmailAndPassword(email.getText().toString(), passWord.getText().toString())
                            .addOnCompleteListener(this, task -> {
                                if (task.isSuccessful()) {
                                    Intent intent = getIntent();
                                    setResult(RESULT_CODE_LOGIN, intent);
                                    finish();
                                }else {
                                    Toast.makeText(LoginActivity.this, "ログインに失敗しました", Toast.LENGTH_SHORT).show();
                                }
                            });

                }else {
                    passWord.setError("必須項目です");
                }
            }else {
                email.setError("必須項目です");
            }
        });

        createAccount.setOnClickListener(v -> {
            Intent intent = new Intent(LoginActivity.this, CreateAccountActivity.class);
            resultLauncher.launch(intent);
        });
    }

    ActivityResultLauncher<Intent> resultLauncher = registerForActivityResult(new ActivityResultContracts.StartActivityForResult(),
            result -> {
        if (result.getResultCode() == CreateAccountActivity.RESULT_CODE_CREATE_ACCOUNT){
            Intent intent = new Intent(LoginActivity.this, MemoListActivity.class);
            setResult(RESULT_CODE_LOGIN, intent);
            finish();
        }
            });
}
33行目(signInWithEmailAndPassword())
ログイン処理の開始は、33行目のsignInWithEmailAndPasswordメソッドによって行われています。このメソッドの第一引数にメールアドレス、第二引数にアカウントのパスワードを渡すことで、ログイン処理が実行されます。ログイン処理が完了した場合は、addOnCompleteListener内の処理が実行されます。そして、task.isSuccessfulメソッドによって、完了したログイン処理が成功したか失敗したかをboolで返してくれます。
CreateAccountActivity
既存のアカウントがない場合は、新たにアカウントを作成する必要があります。ログイン画面から遷移することができます。
package...

import...

public class CreateAccountActivity extends AppCompatActivity {

    public static final int RESULT_CODE_CREATE_ACCOUNT = 2000;

    FirebaseAuth mAuth;

    @Override
    protected void onCreate(Bundle savedInstanceState) {
        super.onCreate(savedInstanceState);
        setContentView(R.layout.activity_create_account);

        activitySetup();
    }

    private void activitySetup(){
        EditText email = findViewById(R.id.email);
        EditText password = findViewById(R.id.password);
        EditText rePassword = findViewById(R.id.rePassword);
        Button create = findViewById(R.id.createAccount);

        mAuth = FirebaseAuth.getInstance();

        create.setOnClickListener(v -> {
            if (password.getText().toString().equals(rePassword.getText().toString())){

                //ここからアカウント作成の処理が開始される
                mAuth.createUserWithEmailAndPassword(email.getText().toString(), password.getText().toString())
                        .addOnCompleteListener(task -> {
                            if (task.isSuccessful()){
                                Toast.makeText(CreateAccountActivity.this, "アカウントを作成しました!",Toast.LENGTH_LONG).show();
                                setResult(RESULT_CODE_CREATE_ACCOUNT, getIntent());
                                finish();
                            } else {
                                Toast.makeText(CreateAccountActivity.this, "アカウント作成に失敗しました",Toast.LENGTH_LONG).show();
                            }
                        });
            }
        });

    }
}
ログインの場合と似ていますが、これでアカウントが作成することができます。
MemoData
これまでに紹介したソースコードの中にも、ちょこちょこ顔を出していたクラスです。一つのメモに格納するデータを意味しています。
package...

public class MemoData {

    public String _uid,_memoTitle,_memoContents,_date;

    public MemoData(String uid, String date, String memoTitle, String memoContents){
        this._uid = uid;
        this._date = date;
        this._memoTitle = memoTitle;
        this._memoContents = memoContents;
    }

    public MemoData(){}

    public String get_uid() {
        return _uid;
    }

    public String get_date() {
        return _date;
    }

    public String get_memoTitle() {
        return _memoTitle;
    }

    public String get_memoContents() {
        return _memoContents;
    }

}
見ての通り、ただのアクセサーメソッドの集まりです。コンストラクタの記述は忘れないようにしてください。
一つのメモに格納させるデータは、ユーザID、日付、メモタイトル、メモの内容の4つです。
CustomListAdapter
ようやく最後です。ArrayAdapterを継承したクラスを作成します。このクラスもこれまでのコード内に何回も顔を出しています。
package...

import...

public class CustomListAdapter extends ArrayAdapter<MemoData> {

    private final int Resource;
    private final List<MemoData>  _MemoData;

    public CustomListAdapter(@NonNull Context context, int resource, List<MemoData> memoData) {
        super(context, resource, memoData);
        Resource = resource;
        _MemoData = memoData;
    }

    @Override
    public int getCount() {
        return super.getCount();
    }

    @Nullable
    @Override
    public MemoData getItem(int position) {
        return super.getItem(position);
    }

    //リストカードに日付、メモタイトル、メモ内容を表示させる
    @NonNull
    @Override
    public View getView(int position, @Nullable View convertView, @NonNull ViewGroup parent) {

        final ViewHolder holder = new ViewHolder();
        View v;
        if (convertView != null){
            v = convertView;
        } else{
            v = LayoutInflater.from(getContext()).inflate(Resource, null);
            holder.memoDate = v.findViewById(R.id.memo_date);
            holder.memoTitle = v.findViewById(R.id.memo_title);
            holder.memoContents = v.findViewById(R.id.memo_contents);
        }

        MemoData data = _MemoData.get(position);

        holder.memoDate = v.findViewById(R.id.memo_date);
        holder.memoDate.setText(data.get_date());

        holder.memoTitle = v.findViewById(R.id.memo_title);
        holder.memoTitle.setText(data.get_memoTitle());

        holder.memoContents = v.findViewById(R.id.memo_contents);
        holder.memoContents.setText(data.get_memoContents());

        return v;
    }

    static class ViewHolder{
        TextView memoDate,memoTitle,memoContents;
    }
}
ArrayAdapter